Saturday, June 3, 2017

“Planned Happenstance” in Music Composition/Production

Hey guys! it's been a long time. It has been 4 years. I wrote the last article when I was starting college, and now I'm out of college! Lots of things changed in my life - People, ideas, thoughts, hobbies.

I could continue this blog here but I've been active on tumblr a lot and unlike the old days where I had lots to say about a few things, today I have a little to say about everything! Like the title of this post! Sorry but you'll have to do one extra click to get to the article.

Here's the article on my new blog!:
https://aayushpathak.tumblr.com/post/160915112898/planned-happenstance-in-music

Follow the new blog too!
Thanks!

Thursday, November 21, 2013

How to install a third-party Google Chrome extension


There are not many people who do it but still sometimes we come across third party browser extensions for e.g Yesterday I was installing a download manager called "FlashGet" (Try it it's pretty good). It works with two of the leading browsers that is "Mozilla Firefox" and "Google Chrome". The extension for this very software was directly available in the Firefox add-on page but it wasn't there on the "Chrome web store". Instead, when I chose to install the browser support for Chrome it just downloaded a ".crx" file and I got this error. So it came to my knowledge that the new Google Chrome can't apply off-store plugins.


So, to fix this, you can try 2 things:

1. Download the extension-->Open the extension page from the menu-->Drag the downloaded extension to the page

2. Or there's a permanent solution: Right click on Chrome icon-->Properties-->add "--enable-easy-off-store-extension-install" without quotes to the target at the end and apply. Now you can install any off-store plugin!


Saturday, November 9, 2013

How to Uninstall/Delete Ubuntu from Windows: The safest way

So, I ran into this issue just recently. That explains my love for this open source masterpiece....I loved it so much that I didn't know how to delete it until like yesterday!! Hah!!

And now that I have deleted it (just because I wanted to free up my drive space :( ) I ran into quite a few problems which made me kinda nervous. So I thought sharing them would be good. I know there are a lot of tuts online for this but still....they sometimes confuse people and make them worry....they had me woried at least....with all those abbreviations like "MBR" and "BIOS" one can only look at it and say, "Okay that's some shit."........so let's cut to the chase

There are lots of ways in which people install Ubuntu and the simplest way is with the Windows installer (usually long term support packages come with a windows installer) or "wubi.exe". If you've installed it this way, you can uninstall it like any other Windows software. Just go to the "Add or remove programs" in the start menu and you're done. No further procedure!

But if it is some other version that doesn't support direct WUBI installation and requires you to make a CD/USB then you're in for the adventure...

Things you'll need:
1. EaseUS Partition master (You can get it from here)
2. Your Windows CD/DVD (Important! Don't attempt this gig without this baby!)
3. Ubuntu installed ( -_- wtf are you reading this article for?)

And that's it. While installing Ubuntu yall have had to create some extra disk partitions for it's filesystem. Now it's time to delete them. In many cases there is a very common problem that users cannot delete those partitions from the default Windows disk management tool (See the picture below- the delete option isn't activated).  But if you're able to do that no worries just follow the below procedure with the default Windows partition manager instead.


So we're gonna use a third party tool called EaseUS Partition Master to deal with this. Now it's very important for you to identify the correct partitions or you will simply end up deleting your windows partition. So first, open the EaseUS manager and locate the partitions. To reduce the confusion, remove all the external storage devices connected to your PC. And now you can delete every other partition which is not a Windows partition. 

The program will automatically reboot your PC in a different mode and carry out some tasks, you don't have to worry about it. But the next time when the system reboots it wont boot into any OS.

This is because you have deleted the partitions which contained the "GRUB" menu (The interface that was letting you choose the OS after starting till now) and we have also deleted it's ability to boot into Windows!

At this time, insert your Windows CD and boot. When the menu shows up, select "Repair".


Choose Command Prompt and type these commands:
bootrec /fixmbr
bootrec /fixboot

XP users need to run the recovery console from Windows XP CD and then type fixmbr when at the command prompt.

Now your windows will boot normally!

Now to reclaim the freed space you can use any Disk Manager and reallocate it to the partitions that you want.

You've successfully Uninstalled Ubuntu!!!!!!!!! 

Saturday, June 8, 2013

How to make the most out of your Android smartphone

Well, Smartphones and tablets have brought a revolution and a dramatic change in all of our lives. Nowadays we know the details of their screen more than our own face (Ever girls! Even though it may look like they never reply to our messages and posts but still, they just look at their screens every minute! :P ).

We often get bored after using the same ol' thing for a long time. Well you can get bored of your face too but not many people can afford a plastic surgery. But fortunately, Android offers us a giant bunch of ways in which we can give our device a complete facelift/plastic surgery/brain operation/and any other ridiculous things that you'd wanna do to your body and personality! The reason is obvious, the OS being an open source . We can modify and use it as we wish!

Well, even knowing this, some people say "Dude! I've been using the same thing for months....Now this shit runs slow like internet explorer and I'm bored of this screen!! All I can do is change a couple wallpapers! Who goes to the play store!!?? Download shit and getting used to it takes another 5 days!! Man, imma purchase the new nexus 7 next week"- A typical Mac user kinda guy who has used his phone only for a few months!

Well, lemme tell ya! In the world of open source and free software, everything may not be easy as a couple taps or clicks. But the outcome you'll see will be worth the headache! What if your phone is an old one!? I bet a lot of people never use it to the fullest! Well, no worries, here are some things you can try:

1. Wallpaper Changer Application: A fresh looking screen always catches you eyes! With this app, the wallpaper of your home-screen will change randomly in the time periods you want! So no more fussing around the internet in search of wallpapers. Download it from Google play.

2. Install another Home-Screen Launcher: Everyone knows this. These apps change the appearance of your screens. If you're bored of the current conventional screen then these might do the job. Some good ones are: launcher 8 (A whole new Windows phone type look!), Vire Launcher (A new kind of interface with some nice little animations and a lot of customizations in the paid version), Nova Launcher (A customizable version of the stock 4.0+ launchers with a lot of looks, themes and gestures that we can change), Shells (A complete changeover right from the looks to behaviors and animations to customization. Some of them are TSF Shell and SPB shell 3D).

3. Install Juice Defender application to save your battery life: Run out of battery very often? With JD, you can control the battery use of the phone by some pre-loaded settings and you can also make your own settings. It monitors the wireless connections, CPU usage, Screen Brightness and lowers/increases them automatically to save "Juice"! XD Download it from Google Play.

4. Root your device: This shit is tricky! Only do it if ya know what it means (http://en.wikipedia.org/wiki/Android_rooting) it voids the warranty period of your device so be sure that you won't be needing or you're already out of your warranty period!! Rooting opens the doors to new horizons of customizations. After this procedure, you can do anything with the phone's software  (Even a plastic surgery!) and you get to use a set of COOL root apps like titanium backup to back up your current apps along with their data, install Custom ROM's and a whole lot of other things. This step comes after you've had some experience!

5. Become a member on development forums such as XDA: This is the place where your phone and it's OS will NEVER get old! even after years! You can meet up with thousands of developers and look at hundreds of tutorials be it rooting, installing ROM's and everything else! You can post your queries and get expert replies. All tailormade for your device!

Sunday, April 21, 2013

Feel like a secret agent with TrueCrypt's awesome drive encryption!!

A pretty funny title but that's what I felt after using TrueCrypt. FYI It's a drive encryption software i.e it can mount a "Virtual Disk Drive" containing the files that you wanna secure which is protected by a password and a mind-boggling list of encryption algorithms. It can even encrypt a whole system drive and protect it (Even the drive where your OS is installed). It's easy to use, and it's free!

Here's a quick walkthrough (Stepwise):

1. Creating a volume:

Open the TrueCrypt interface and click on "Create Volume".

2. Configuring the volume:

The program will now ask whether you want to create a file container or encrypt a drive. We'll create a container for now. So select "Create an encrypted file container".


Now it will ask "Which type of volume do you want?". There are two types of volume i.e Standard and Hidden. A hidden volume is a "Volume within a volume" but it better suits the real secret agents as very less people will try to extort the password out of us. So we'll go with a standard volume. Next part is selection on an encryption method or algorithm. It's got a list of different algorithms you can select any one that you like (it doesn't really matter if you're not a secret agent :P all the algorithms are strong enough ). Next it will prompt you to select a place to store the container, select any directory that you want and after that it will ask the "size" of the directory. Go for a larger size if you want to store bigger files, it's basically like the hard-disk-memory of a drive. 


After that, it will prompt you to choose a password. Choose a strong password to increase the cryptographic strength of your container so that it becomes difficult for stray hackers to break in.
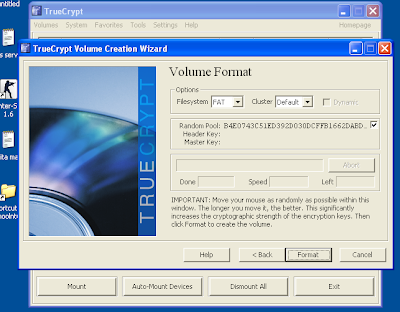
The next part is the fun part. It'll tell you to move your mouse randomly as it creates a "random pool" to strengthen the encryption (It's really fun!). After moving/shaking your mouse for sometime click on "format" the container will be created! you're done!


3. Mounting and dismounting:

Now that you're done creating the container, click finish and go back to the main TrueCrypt screen. Select any drive letter from the list and then click "select file" and navigate to the path where you stored it and select the file (It will be a very non-suspicious looking file which cannot be opened normally). Then click on "Mount". Enter your password and Hurray! when you open "My Computer" you will see an extra drive partition denoted by the letter you selected in the previous step. This is your private container where you can put your files. Put all the necessary files in it and when you're done close My Computer and click on "Dismount". The drive will be invisible again! and please note that you can keep the container file anywhere you like (e.g  a pen-drive or any other folder). And if you wanna modify any data inside your volume you can  Mount it again> modify the data (edit documents, add/remove files etc.)> dismount . Your setting will be saved! And if you're nomadic ( :P ) and keep moving, you can even install TrueCrypt on your pen-drive and take the container file with you so that you can access it on the go! It's simply the best and most handy solution to almost all encryption needs and it's completely safe!


Thursday, February 14, 2013

The story of a "strong" password: How exactly a strong password is "unhackable"?

This might as well be the least asked question but we still do it!! We all prefer keeping long and complicated passwords with digits, symbols, punctuations etc. only knowing a plain reason which not many understand (but still know) that "It makes the password STRONGER!"....Ever wondered as to "How can a password be STRONG?? "...If not, there's no need to because the answer lies below...

What does a strong password mean?
Well technically even a nine year old can give this answer- A strong password is difficult to guess, hack, decode, decrypt and other geeky shit!
The answer is pretty correct! There's nothing more to add to it! And having such a password is very likely to enhance the security of your account!

So how come it's so difficult to hack a 'strong' password?
Before you start reading this section, make sure you know a teeny-weeny bit about encryption. If you don't, just scroll through a recent mini article that I've written: Click here just the basics.....

So here's the thing. Hackers usually approach a password by guessing it (It rarely works). So with such a complicated password ...there is an absolute zero chance of merely mind guessing it. So the next thing they do is intrude the servers of the very website holding your account and try to find your password (Because they are 100% sure it's in there)....But even in the servers, the passwords of all the users go through some whacky encryption until they reach to their spot!

And as you know about encryption algorithms, they ain't no pieces of cakes too! Most websites nowadays use algorithm like MD5, Which is well known as "The one way encryption" Heck Yeah! You can encrypt something to md5 easily but decryption can only be done by the almighty creator of mankind! (That means it cannot be decrypted directly). Some chaps might be laughing because I mentioned about Brute Force guessing in some previous articles but that can take CENTURIES to decrypt an md5 key.That is because any md5 key needs a "match" or a "reference" and the website gets its reference key when user enters the password during log in. And a strong password has infinite possibilities and there are no references even in the website's server.

And that is the reason you should not keep a single word or a phrase password like "Hello" because this is an easy word and the hacker can approach the md5 key by simply matching  a list of common dictionary words which are easily available even on the internet! This means 'Hello123' is many times stronger than 'Hello'. As seen clearly, a simple word list cannot solve a complicated password, and creating a word list with every possible combinations and lengths of letters, symbols and numbers is next to impossible even if done by a computer (A normal one). For that we'll need a huge "supercomputer" (Like TRANSLTR in Dan Brown's novel- Digital Fortress ) which will take another billion dollars to build. Such word lists with all possible combinations of a certain set of characters are called "Rainbow Tables"....Rainbow tables with all combinations can only be achieved by some supercool organizations like CIA, FBI or something! You might find some results of Googling "rainbow tables", most are fake and the others are limited....such tables cost millions of dollars and can never be Open Source...

However strong the password is, cheap tricks like extortion, phishing, Keystroke Logging  still prevail....I've got some tips for that:
1. Change your password if you have logged in at your friend's house of at an internet center after coming at your home computer.
2. Never trust pages that ask for your facebook/google/other password. If they do make sure that there is 'https://' in that site.....

That'll be it!

Tuesday, February 5, 2013

Be secure and beat spam with 10 minute mail!

Coming across an awesome website you often get compelled to register for an account so that you can access more “handpicked” stuff and share, comment and post on it. Almost every website asks you for your email address and you don’t give it much thought and you enter your primary email, receive your password or a confirmation email.
After 1-2 days you check your mail and there are hundreds of ads, offers, news and other useless stuff from the website you registered on some time back (some even from the ones you never knew about). This is annoying for most users when a site uses your inbox as such a blotting paper!
This phenomenon is termed as “spam”!!
However I came around an internet tool that helps us avoid “spam” to a great extent. It’s called “10 Minute Mail“. Normally websites don’t have any business with your email after you’ve seen the confirmation link (apart from resetting password but what’s the harm in remembering it? ). This tool creates an email account for you that self destructs after 10 minutes. Seems pretty useful while registering on some website. You have practically no use of the id after registration. This blocks spam and is also more safe as your original email id is nowhere in the scene!! I loved this tool!!! Felt like sharing and so I did!!